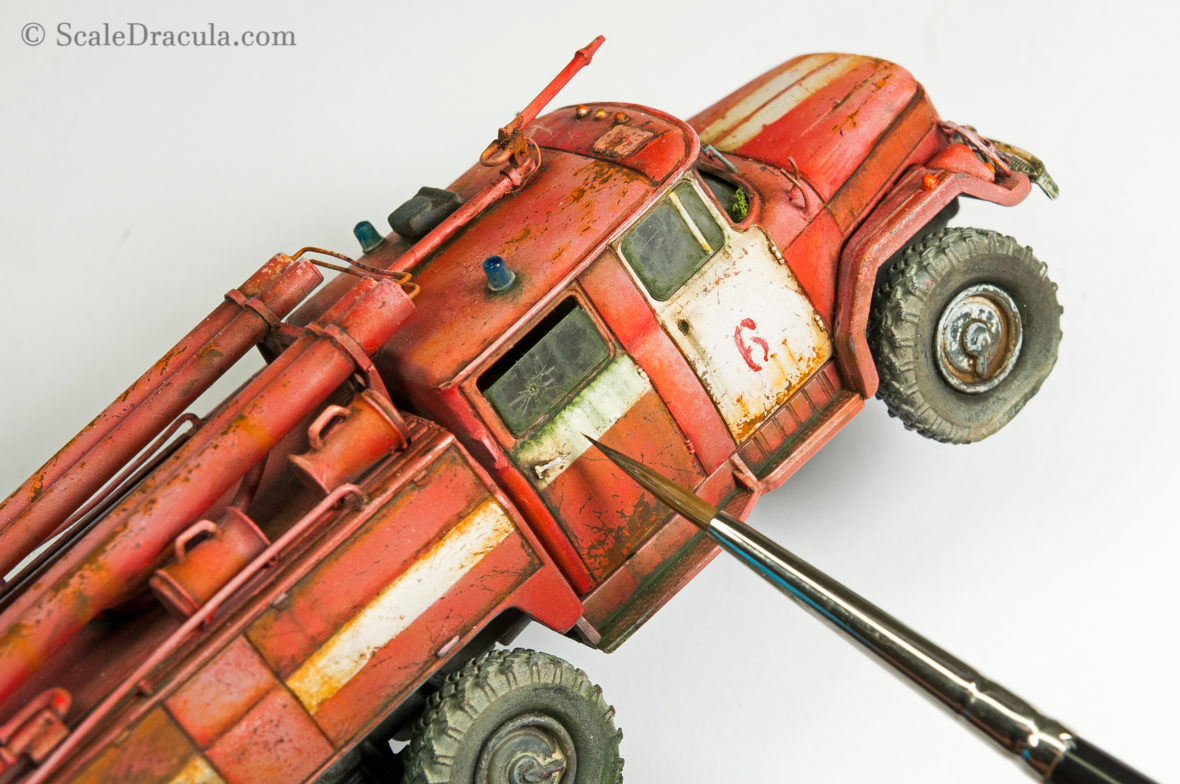
And here comes the weathering. I was really looking forward to this stage as I was curious how all the techniques I know from 1:35 scale would work on a 1:72 model. A smaller scale obviously requires more precision. But I also think it needs more tonal variety and contrast so the tiny sections of the model would be easily recognizable. It was my first attempt at a 1:72 build so I was kind of learning as I went…
If you joined the story just now, you may want to look at the the previous parts:
WEATHERING
After the painting stage I left the base colour very light and faded, actually more pink than red. Now it was the time to bring a bit of that red back. The oilbrusher red is a rather cold shade, so I added a little bit of yellow here and there to make it look warmer.
The paint is applied in all the shadow areas. I also blended it around the panels to make them look more pronounced. As always, a good quality brush dipped in white spirit is used to move the paint around.
The way I see it, the contrast is the most important aspect of the model, especially in the smaller scales. So when you do a fading like this, don’t be afraid to crank it up to 11. You will be able to tone it down later if necessary.

The next step was the general dark wash. I realized the technique doesn’t really work in the 1:72 scale the way I am used to. The panel lines are obviously much smaller and shallow, so you can’t count on capillary action to spread your wash for you.
So I decided to use a thicker oil mix that I spread around all the details. Then I blended the paint very carefully leaving only thin lines of colour. A good brush with a pointy tip is essential here.
Talens’ raw umber and Starship Filth Oilbrusher were used for this job.

Here’s how the model looks at the moment. The ‘wash’ gave a lot of definition to all those details. Also, notice a slight tonal shift from pink to red on the base colour.

I decided to deal with the white parts separately so they wouldn’t get contaminated by the dark wash. I applied a thin filter of yellow ochre leaving some of the white areas clean and untouched. Again – contrast is everything. I need this clean white to be the peak of my colour spectrum.

Now it’s the time to work on the rust tones. I begin with a light mix of cadmium orange and yellow ochre. The first step is to create a subtle rusty mist with a paint diluted to filter density. This will be a base for the darker tones.

Now I’m adding darker colours, a mix of raw umber and light oxide red in different proportions. Basically little dots of red-brown that I blend with gentle dabs of the brush.

It’s also a good moment to create some rusty streaks. I do it by dragging the paint down with the tip of the brush. A thicker, undiluted oil paint works best for the streaks.

An abandoned vehicle like that would likely absorb a lot of moisture and dirt. Green tones are a perfect way to recreate this mouldy look.
Here I’m working on the lower part of the tyre.

That’s what I got right now.
I forget to mention it earlier but I covered all the paint chips with a light rust colour as well.

The window parts in the kit come as rough styrene bricks. No, thank you…

Instead, I cut rectangles out of transparent plastic sheet and I glued them in using PVA glue. The front windshield would have been much more difficult to scratch-build, so I decided not to use it at all. It makes sense to leave some of the windows missing anyway.

I figured I could add some moss on the spots that I had previously treated with green grime. After some head-scratching, I chose ordinary package sponge for this. A bit of CA glue was used to sort of compress the sponge a little. Then I tinted it with green acrylic paint and I attached it to the model with PVA glue.
The sponge doesn’t really fit the scale so I only placed tiny pieces here and there.

As the last step I came back to the green oil paint. This time I made some wet mouldy stains on the windows. I also created some streaks of grime going down the door.

I didn’t really plan this, but as it turns out I weathered the whole model using almost exclusively oil paints. It proves once again how powerful and versatile they are. Trust me on this, folks…
So… The model is ready but the SBS is not over yet. I think a heavily weathered car like that will just look odd on a dull wooden base. So in the last part of this series I’ll be building a little diorama to give my ZIL some context. See you soon!


4 Comments
Cristian
19 November 2019 at 10:03This looks absolutely AMAZING!!! I’m really looking forward to the part about the base!
Cheers,
Cristian
ScaleDracula
20 November 2019 at 23:32Thank you! I’ll post it as soon as I can!
Caleb
28 December 2019 at 22:30Love your website. I just recently started modeling and it’s nice to have a place to get some direction. Do you do muscle/show cars by any chance?
ScaleDracula
29 December 2019 at 16:20Thanks! And no, I usually gravitate towards subject with lots of weathering and show cars are pretty much the opposite. But in the future, who knows?